INS’HACK :: 2019 :: Neurovision Misc 206 pts Writeup
Challenge details.
| Category | Points | Solves | Difficulty |
|---|---|---|---|
| Misc | 206 | 20 | Hard |
1. Challenge description
We found this strange file from an AI Startup. Maybe it contains sensitive information…Neurovision files
2. SOLUTION #1
We are given an HDF5 file named neurovision-2d327377b559adb7fc04e0c3ee5c950c, executing the file command will tell us its an HDF5 file.
file neurovision-2d327377b559adb7fc04e0c3ee5c950c
# outputs
neurovision-2d327377b559adb7fc04e0c3ee5c950c: Hierarchical Data Format (version 5) data
For More on HDF5 structure HERE
executing strings on the model file (I believe its a model), we get the following:
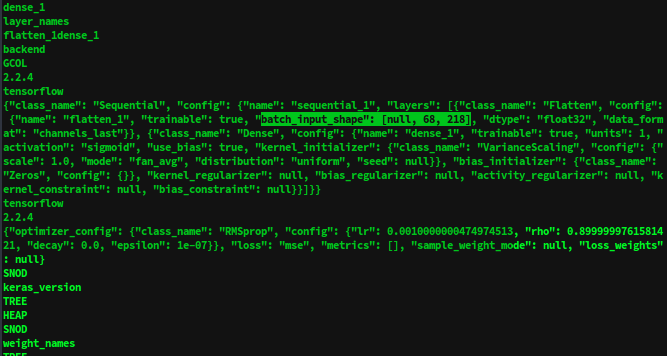
some interesting infos.
{
    "class_name": "Sequential",
    "config": {
        "name": "sequential_1",
        "layers": [{
            "class_name": "Flatten",
            "config": {
                "name": "flatten_1",
                "trainable": true,
                "batch_input_shape": [null, 68, 218],
                "dtype": "float32",
                "data_format": "channels_last"
            }
        }, {
            "class_name": "Dense",
            "config": {
                "name": "dense_1",
                "trainable": true,
                "units": 1,
                "activation": "sigmoid",
                "use_bias": true,
                "kernel_initializer": {
                    "class_name": "VarianceScaling",
                    "config": {
                        "scale": 1.0,
                        "mode": "fan_avg",
                        "distribution": "uniform",
                        "seed": null
                    }
                },
                "bias_initializer": {
                    "class_name": "Zeros",
                    "config": {}
                },
                "kernel_regularizer": null,
                "bias_regularizer": null,
                "activity_regularizer": null,
                "kernel_constraint": null,
                "bias_constraint": null
            }
        }]
    }
}
We have the input size which seems to be taking a 2-dimentional array (68x218) and outputs a single number between 0 and 1, so we can guess that the model takes a 68x218 image and outputs some kind of probability maybe. one more thing, we are dealing with a single layer Neural Network (No Hidden Layers).
this is clearly a Keras Model. Let’s load the model using the Keras python library and see wat we can do.
If you don’t have the Keras Library installed on PC, you can work in Colab, just open a Python3 notebook and start using Keras and other python libraries.
NOTE: Pillow and numpy are also required if you are using your own computer
2.1 Load the Model and check layers and weights
from keras import load_model

model = load_model("neurovision-2d327377b559adb7fc04e0c3ee5c950c")
Let’s check the layers;
>>> model.layers
[<keras.layers.core.Flatten object at 0x7f2b069de860>, <keras.layers.core.Dense object at 0x7f2b069de9b0>]
>>> model.layers[0].input_shape
(None, 68, 218)
>>> model.layers[1].output_shape
(None, 1)
What about the weights
>>> model.get_weights()
[array([[-4.2567684e-05],
       [-4.2567684e-05],
       [-4.2567684e-05],
       ...,
       [-4.2567684e-05],
       [-4.2567684e-05],
       [-4.2567684e-05]], dtype=float32), array([0.], dtype=float32)]
We can notice that all weights have the same absolute value, some are positive and some are negative which is kinda weird.
Let’s try reshaping the weights array to a 2D array of size 68x218 and creating an image by turning all the negative weights to black pixels and all the positive weights to white pixels.
Here is how you can do it using the Pillow Imaging Library
import keras
from keras.models import load_model
import numpy as np
from PIL import Image

# Loading Model
model = load_model("neurovision-2d327377b559adb7fc04e0c3ee5c950c")

# getting weights and transforming them to values of 0s and 255
pixel_values_ = (model.get_weights()[0] + 1).astype(np.uint8) * 255

# reshape flattened array
reshaped_pixels = pixel_values_.reshape((68, 218))

# Create an image from a numpy 2d array
flag = Image.fromarray(reshaped_pixels)

# save the image, if you are on Colab, you can either export image bytes or save it
# you will find it in /content folder
flag.save('flag.png')
Here is an example from Colab.
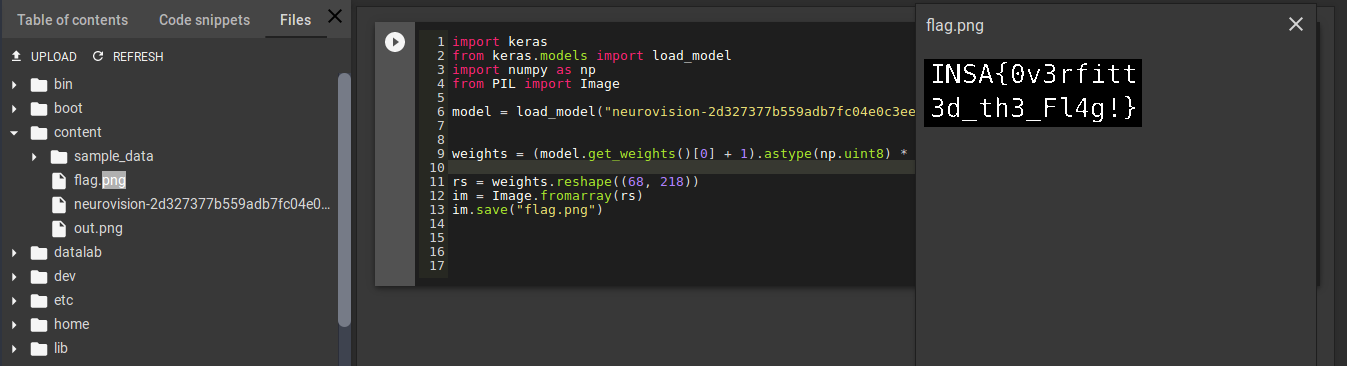
eXecute and get your flag :D
Greetz to @youben11 for his great ideas and contribution.
INSA{0v3erfitt3d_th3_Fl4g!}
SOLUTION #2
This solution generates a random image in a certain way so that the output layer (Which is a scalar output) of our neural network converges to the output we want
We already stated in Solution #1 that the output is a value in this interval [0, 1] (Could be interpreted as a probability)
So, We have a Keras model (.hdf5 file) for a neural network with a single scalar output, for which the activation function is sigmoid, so the output is just the result of the sigmoid function applied to the weighted sum of the input layer which appears to be an image with the size of 68x218, at least it is a 2D array of size 68 by 218.
About the sigmoid function
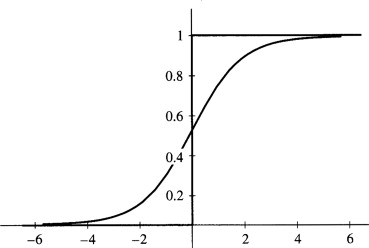
A sigmoid function is a mathematical function having a characteristic “S”-shaped curve or sigmoid curve. Often, sigmoid function refers to the special case of the logistic function shown in the above figure and defined by the formula,
$$ S(x) = \frac{1}{1 + e^{-x}} = \frac{e^x}{1 + e^x} $$
When to use Sigmoid Activation Function ?
One of the main reasons to use the sigmoid function is because it exists in between 0 and 1. Thus, it is especially used for models where we have to predict the probability as an output.Since the probability of anything exists between 0 and 1, then Sigmoid is the best choice.
NOTE: the use of a logistic sigmoid function can cause a neural network to get stuck at the training
As we said above, we will be generating random image and changing it so that the output of our neural network converges to 1 which is our desired value (Probability of 1 that the flag image is correct).
How do we know how to change the image ?
We will be calculating the Gradient of our first layer, this way we know how to evolve the image so we can get an output that converges to 1 which is our desired value.
Image is changed using the equation below,
$$ ImageMatrix = ImageMatrix - (Gradient * learning rate) $$
$$ ImageMatrix \quad -=\quad(Gradient * learning rate) $$
Let’s code the solution
Let’s start by loading our model and defining our input and output layers.
import keras
from keras.models import load_model

model = load_model('neurovision-2d327377b559adb7fc04e0c3ee5c950c')
in_layer = model.layers[0].input    #input layer shape=(?, 68, 218)
out_layer = model.layers[1].output  #output layer shape=(?, 1)
Now, we need to define the gradient and cost functions using the Keras predefined function
from keras.losses import mean_squared_error
from keras import backend
"""
COST FUNCTION
cost function is defined as the mean squared error of the output
layer and the value 1 which our desired value
"""
cost = mean_squared_error(out_layer, 1)

"""
GRADIENT FUNCTION
Gradient function is defined with parameters cost function and
our model input layer
We will use keras backend to define the gradients.
"""
grad = backend.gradients(cost, in_layer)[0]

"""
WE WILL DEFINE A FUNCTION TO RETURN COST AND GRADIENT
WHEN INPUT IS FED
"""
get_cost_and_grad = backend.function([in_layer], [cost, grad])
Now, the cost and gradient having been defined, let’s create a random image using numpy and iterate to modify the first image and until achieving a target cost that we will be defining below.
# generate a random image using numpy
image = np.random.rand(1, 68, 218)
desired_cost = 0.1  # define the target cost
lr = 1000           # set learning rate to 1000, ti will get good results
im_count = 0        # this is used to keep count of intermediate images

while True:
  # get cost and gradient values
  cost_, grad_ = get_cost_and_grad([image])

  if cost_ < desired_cost:
    break
  # alter image so output converges to 1
  image -= (grad_ * lr)
  # save image (not nessessary)
  im = Image.fromarray(((image).astype(np.uint8) * 255).reshape(68, 218))
  im.save("pngs/out_"+str(im_count)+".png")
  im_count += 1
The above code will save save all intermediate images as PNG images, You will find your flag in some of the images at an advanced iteration level.
A Better solution to make a GIF that shows how the flag evolves in time. Here is the code for it. Just make sure you have Pillow installed.
"""
Imports of previous codes here
"""
import keras
from PIL import Image
from numpy import numpy

# generate a random image.
image = np.random.rand(1, 68, 218).astype(np.float32)
desired_cost = 0.1    # desired cost is gonna be 0.1
lr = 1000             # Set the learning rate to 1000

images_list = [] # make a list to store image instances

"""
Iterate until calculated cost <= taegeted_cost
"""
while True:
  # claculate both cost an gradient
  cost_, grad_ = get_cost_and_grad([image])
  if cost_ < desired_cost:
    break

  # updating image matrix
  image -= (grad_ * lr)
  # reshaping image to be stored (Needs Pillow)
  im = Image.fromarray(((image).astype(np.uint8) * 255).reshape(68, 218))
  images_list.append(im)

images_list[0].save("animated_flag.gif", save_all=True, append_images=images_list[1:], duration=100, loop=0)
The above code will generate a GIF showing the evolution of the flag starting from a random image to a full flag.
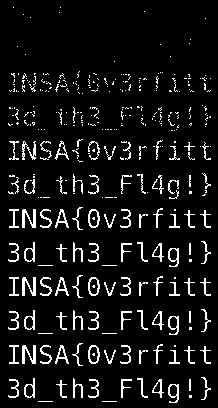
I will include the whole python script later.
Thanks for Reading !